99.8%
99.8%
 Deutsch
 italian
 french
 spanish
 netherlands
 japanese
 chinese
 turkey
 arabic


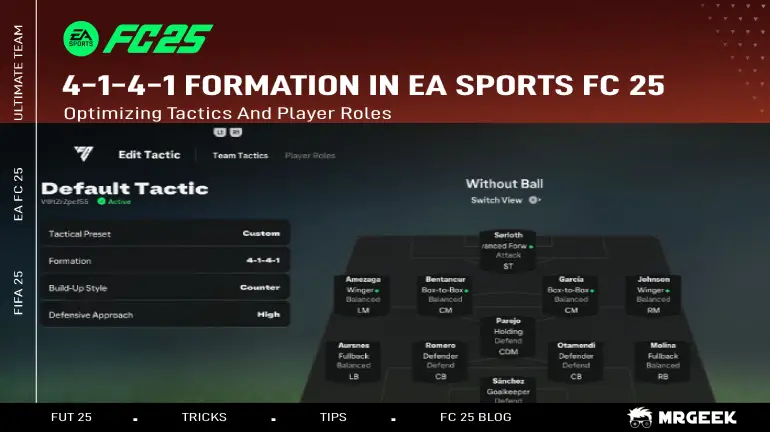
4-1-4-1 Formation in EA Sports FC 25: Optimizing Tactics And Player Roles
Master the 4-1-4-1 in EA FC 25! Learn the best tactics, player roles, and strategies to dominate the pitch with this balanced formation.
Success in the fast world of EA FC 25 highly depends on choosing the correct formation. A well-set formation is not only solid at the back but also defines how one should attack or defend a team. Among many, the 4-1-4-1 formation seems almost balanced, as it offers stability in the midfield while providing ample opportunity for attack. In this guide, we’ll delve deep into the intricacies of the 4-1-4-1, exploring the best tactics to get the most out of it in EA FC 25. before that if you need Cheap FIFA Coins to make your FC 25 Utimate Team check mrgeek FUT Coins shop.
How to Perfect the 4-1-4-1 Formation in EA Sports FC 25
As you rightly pointed out, the 4-1-4-1 formation is suited to a variety of tactical styles. Its blend of defensive solidity and attacking flexibility allows players to balance between controlling the midfield and providing offensive width. However, optimizing this formation requires a careful balance of player roles, tactical instructions, and understanding the game's dynamics.
Here's how you can make the most of this formation:
Defensive Stability and Midfield Control
CDM Role and Tactical Instructions
In the 4-1-4-1, the CDM is used as the key role. A shield for the defense, he is best utilized if he has High Defensive Work Rate and the Stay Back While Attacking Instruction if possible.
You will take this to the next level and further emphasize the role CDMs have by selecting them for "Cut Passing Lanes" and "Stay Central", ensuring they break up opposition attacks effectively. If your CDM is particularly strong-for example, a player with good stats in the air and while standing-then you could use him on "Aggressive Interception", allowing them to win the ball high up the pitch a lot more often.
Centre Back and Fullbacks
For your center-backs (CBs), it’s vital to focus on their Defensive Positioning and Composure. They should be instructed to stay central, maintaining a "Stay Back While Attacking" role. It would also help to set them to "Aggressive Interceptions" for high pressing situations.
The fullbacks (RB/LB) in this formation should provide width, but they shouldn’t get too far forward in the attacking phase unless you’re pressing high. Setting them to "Balanced Attack" will allow them to support the wingers, LM/RM, without compromising the overall defensive structure of your team. You can also try a "Join the Attack" instruction if you want to exploit the flanks and stretch the opposition's defense, but only use this when you're in control of the match.
Midfield Control and Attacking Transition
Box-to-Box Central Midfielders (CMs)
The central midfielders in the center of the park are pivotal with possession and in transitioning from back to front. Their roles should be set to Box-to-Box with a Balanced or Get Forward approach.
For players like CMs, they must be able to support the attacking and defending simultaneously. The central midfielders, depending on how energetic they are, will be seen influencing the control in the tempo of the match. You can also assign one of these players as the "Free Roam" so that he constantly picks up the little pockets between lines to create overload at any specific positions.
Wide Midfielders (LM/RM)
The LM and RM are the creative outlets of the team. The LMshould be a Wide Playmaker, acting as a passing and crossing conduit, creating width for the team.
On the other hand, the RM can be set to a Wide Forward or Get in Behind role for more direct attacking runs. The RM could also be told, in certain situations, to "Cut Inside" to act as an additional goal-scoring threat and exploit space.
This structure thrives off the basis of the wingers being able to pull the defense this way and that, providing crosses into the box. For this, the "Crossing Runs" instruction can be changed to "Early Crosses" or "Whipped Crosses" so both fullbacks and wide midfielders are on task finding dangerous balls into the box.
Striker and Attacking Flexibility
Advanced Forward Role
ST in the 4-1-4-1 should be an Advanced Forward for the sole aim of scoring. This role allows the player to make intelligent runs behind the defense and capitalizes on any lapse in the opponent's defensive line.
"Get in Behind" will encourage forward runs, while "Stay Central" keeps them positioned for crosses or through balls from midfield.
Tactical Changes During the Game
That is the beauty of the 4-1-4-1: seamlessly moving between defensive solidity and attacking aggression. If you need to protect a lead, you can switch to a "Drop Back" defensive style and a "Balanced" or "Short Passes" build-up.
You can tell the wingers to be more direct in their passing, and change the build-up to "Fast Build Up" to ensure quicker transitions. Alternatively, if you are chasing the game.
Pressing and Compactness
High Pressing vs. Balanced Defensive Approach
The pressing style you use in this setup is very important. Balanced is usually the safest for most situations, making sure you don't lose shape or fitness. If you are playing against a team that likes to maintain possession, you can increase the intensity of pressing to disrupt their rhythm.
A "Press After Possession Loss" or "Constant Pressure" approach will make use of the lone striker and take advantage of wide players, LM and RM, to press high and win the ball back quickly. This suits the 4-1-4-1 if you want to catch your opponent off guard.
Line Height and Depth
With depth set to 40 - which is somewhat balanced - your team will press in a compact manner without leaving gaps behind. If you use higher depth - around 60 - you increase the intensity of pressing, but do not forget that your defense will be more vulnerable to counter-attacks.
Comparing the 4-1-4-1 to Other Formations in EA Sports FC 25
The 4-1-4-1, in that regard, can be said to be a more flexible tactical setup when compared to some other more conservative formations like 4-4-2 or 4-3-2-1, especially for midfield control and counter-attacking.
4-4-2 is a very solid, dependable setup that offers good balance between attacking and defending without offering the same level of midfield control. This 4-1-4-1, however, adds a proper defensive midfielder who can break up the attacks and dictate the game from deeper positions with more possession-based football in mind.
The 4-3-2-1 is similar to the 4-1-4-1 but often carries a greater emphasis on wingers and quick, attacking transitions, whereas the 4-1-4-1 can offer more control in central areas with the ability to transition into a 4-4-2 for defensive situations.
Conclusion
The 4-1-4-1 in EA Sports FC 25 is very adaptive, able to balance out the scales between defense and attack. This setup invites controlled possession with width provided by both the wingers and fullbacks for offensive support. Fine-tuning of the player roles, tactical instructions, and transitions of defensive/attacking will allow this formation to fit most any playing style.
Whether you like to boss possession or press high for turnovers, the 4-1-4-1 provides a flexible and balanced option. By adapting your tactics depending on the ebbs and flows of the game, you will have an edge over teams using more static formations; thus, making it dynamic and competitive in EA Sports FC 25.

.webp)